Archive for the ‘Breakfast’ Category

Fallen Berry Muffins

April 26, 2010

I don’t make muffins very often because, for me, they are an awfully sweet way to start the day.  Besides, if I am going down the sweet breakfast road, I’m much more inclined toward pancakes and waffles.  D loves muffins, though.  I recently made some banana muffins out of Heidi‘s wonderful book Super Natural Cooking only to discover (after almost 8 years of marriage!) that D is not fond of banana in baked goods.  He does like banana bread, though…hmmm…

Anyway, I felt I owed him some of his kind of muffins.  These are them.

I wanted to make blueberry muffins, but discovered we had only a few blueberries left in the freezer.  Fortunately, we also had some strawberries, so I combined the two.  I decided to add some sour cream too because I wanted to offset the sweetness of the muffins (which we all know are really cupcakes in disguise, right?).  I started with a recipe out of the King Arthur Flour Baker’s Companion and sort of winged it.  They turned out darned good, if a little flat on top.

Fallen Berry Muffins

  • 8 T butter
  • 1 c sugar
  • 2 eggs
  • 1/2 t salt
  • 2 t baking powder
  • 1/2 t cinnamon
  • 2 c AP flour
  • 1/2 c milk
  • 1 t vanilla extract
  • 1/2 c strawberries, roughly mashed (I used frozen)
  • 1/2 c blueberries (again, frozen)
  • 3/4 c sour cream
  • cinnamon-sugar for sprinkling

Preheat the oven to 375°.

Cream together the butter and sugar.  Add the eggs one at a time, beating well after each.  Add the salt, baking powder, cinnamon and then the flour alternately with the milk.  Add the strawberries, but don’t do any more stirring than necessary.  Stir too much and the muffins will get tough.  Now, gently and gingerly, stir in the blueberries and vanilla extract.

Dole the batter out into muffin tins. (With liners, if you prefer.  I do).  My batch filled 12 muffin cups.  Take the sour cream and dollop the top of each muffin with about a teaspoon (but, really, don’t bother measuring).  Now smoosh the sour cream down into the center of the muffins with your spoon or a finger.  Whatever works.

Sprinkle the tops of the muffins with cinnamon-sugar.

Bake for 30 minutes.  Remove them from the oven and cool in the pans for 5 minutes before turning out onto a cooling rack. (KAF tells me that muffins left in the pan will steam, creating a tough crust).

Yum 🙂

Mesquite Flour Pancakes

January 5, 2009

Mesquite Flour Pancakes

Early last fall one of my coworkers surprised me by bringing in two large buckets filled with mesquite pods she had collected from her property. She knew that I have a baking habit and thought I might be able to use the pods. All I had to do was take them to get ground into flour/meal. In Tucson we have a great organization called Desert Harvesters who set up at several locations around town in the fall to grind mesquite pods. Sadly, I managed to miss two different weekends when they had set up to mill the pods. In the end, the lovely pods that I had been gifted became infested with some sort of bug while sitting in my garage. I can not tell you how wasteful I felt. I had such a great opportunity, and I blew it.

Fortunately, acquiring mesquite flour isn’t terribly difficult in Tucson. Mesquites are the most common shrub/tree in the desert Southwest. The pods, ground into a flour or meal, have been a part of local cuisine for hundreds of years. In fact, several studies have show that, like many other desert foods, the sweetness of the meal is deceiving. In truth, mesquite flour can be wonderful for controlling blood sugar levels. Obviously, this is a boon to people with diabetes, but I think it’s really great for all of us.

I picked up some flour from my beloved Native Seeds/SEARCH. It is also available here, here and here. It’s a little pricey, but is used in smaller quantities and in combination with regular flour.

These pancakes have no sugar in the batter. In the picture, they are show with honey as a topping. For the gluten-free folks out there, just substitute your favorite gluten free flour mix for the all-purpose portion of this recipe and you’re all set!

Mesquite Flour Pancakes

  • 1 2/3 cups all-purpose flour
  • 1/3 cup mesquite flour
  • 1/3 teaspoon salt
  • 1 teaspoon baking powder
  • 2 cups milk, maybe slightly less
  • 2 eggs, well-beaten
  • 1/2 stick butter, melted

In a large bowl sift together the all-purpose flour, mesquite flour, salt and baking powder.

In a separate, smaller bowl whisk together the eggs, butter and milk. Add the wet ingredients to the dry ingredients and mix until just combined. There will probably be some lumps, but if you mix too much your pancakes will get tough.

Pour your batter onto a hot , lightly greased skillet in 2 T increments for silver dollar sized pancakes or in 1/4 c dollops for full-sized pancakes.

Serve with warm honey, maple syrup or fruit preserves.

Mesquite Flour Pancakes

___________________

UPDATED 1.7.09:

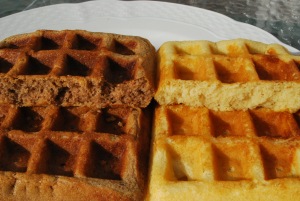
Check out Peter’s comment below if you are planning to make these gluten free.  The picture below is his and shows the difference between waffles with mesquite flour subbed in using his method and plain GF flour waffles (looks like moslty just color to me).  He offers some experience with GF flour mixtures that I don’t have, hopefully it helps!

GF Mesquite Waffles

Apfelpfannkuchen

December 8, 2008

Apfelpfannkuchen

A few weeks back I promised I would post the outcome of our German Apfelpfannkuchen experiment. You see, when Dylan lived in Germany during high school his host Grandmother regularly made German Apple Pancakes. Thing was, when he got back to the states he couldn’t find the same type of pancake anywhere.

Sure, there are a lot of venues like OHOP that serve a dish that is called a German Apple Pancake, but that’s really more of a dutch baby with apples and lots of sugar. The pancakes, or Pfannkuchen, that D was served were practically savory, save for sugar sprinkled over the top. In fact, he says that the same batter was used for both the Apfelpfannkuchen and Pfannkuchen that featured Fleischwurst.

It is absolutely possible that the version that is predominate in the U.S. came from another region of Germany. I don’t know all that much about different regional cuisines. And, though I’m sure I’ll learn and share more information on that as time goes on, I don’t have much to put in this post in that regard. The one thing that I do know is that (purportedly) Bavarians have a predilection for cake at breakfast. This version certainly qualifies as just that.

Anyway, back to the experiment. Of course, we decided that we wanted to make the same pancakes he had in Germany here at home. The first attempt followed a recipe in Cooking Light, which we didn’t love. The product was intensely sugary and too eggy and dense to be an accurate replication.

I did some digging around using our good friend the internet and found several recipes that seemed to be more along the lines of what we were after. The recipe below is a conglomeration and adaptation of all of my findings. Dylan approved of the final result, though he did let me know that it was still not exactly like what he had in Germany. While I sandwiched the apples between batter, the Pfannkuchen he had in Germany had the apples on top. I’ll point out where you would vary the recipe to achieve that goal, should you choose to try that method.

Apfelpfannkuchen

  • 1 1/4 c AP flour
  • 2 T sugar
  • 1 t baking powder
  • 1/4 t salt
  • 1/2 c milk
  • 1 egg
  • 5 T unsalted butter, melted, divided
  • 3 medium apples
  • 2 T sugar
  • 1 T cinnamon
  • 1/4 t fresh ground nutmeg
  • 1 T lemon juice
  • 1/4 c water (for my version)

Sift together the first four ingredients, through the salt, in a large mixing bowl.

In a separate bowl combine the milk, egg and 1 T melted butter. I used the milk to temper the melted butter before adding in the egg so that the egg wouldn’t scramble and the butter would be more evenly distributed.

Pour the wet ingredients into the large bowl and mix until the batter just comes together. Don’t worry if there are a couple of lumps. For a quick cake/muffin batter like this you want to avoid mixing too much so your final dish isn’t too tough.

Now that the batter is done, set it aside while you deal with the apples.

Peel, core and slice your apples into approximately

1/8″ thick wedges. Toss in a medium bowl with the cinnamon, sugar, nutmeg and lemon juice.

In a 10″ skillet heat 2 T of butter and swirl to coat the bottom of the pan. Sauté the apples for about 3 minutes.

Add 1/4 cup of water to the skillet and bring to a boil. Cover the apples and simmer 3 minutes. Remove them from the pan and set aside.

Melt the final 2 T of butter in the skillet and turn the pan to coat the bottom and sides as evenly as possible. Obviously you won’t be able to get the butter all of the way up the sides. That’s OK. Just coat as much as you can.

Pour 1/2 of the batter into the pan. Place the apples on top and cover with the remaining batter.

Apfelpfannkuchen

Cook over medium-high heat for about a minute, then lower the heat and cook for 3 more minutes. To finish, move the skillet to your broiler and cook 3-5 minutes, until the top begins to brown. If you aren’t using a cast-iron skillet, please double check to make sure the handle of your pan is oven safe before you stick it in there!

With a spatula, gently loosen the pancake from your skillet and slide it onto a plate to serve. Dust with powdered sugar if desired.

If you are making the apples-on-top version, you’ll only pour half of the batter in the skillet and cover it with half of the apples. The rest of the cooking steps are the same. You’ll need to repeat the process and make 2 pancakes for the quantities listed in this recipe.

The one pancake that we made easily fed the two of us for breakfast with extra for snacking. I think you could feed 4 folks off of one pancake, especially if you served something yummy like bacon with it.

Guten Appetit!

Apfelpfannkuchen

Black Beans & Rice

November 10, 2008

So, originally I was planning to post a true German Apple Pancake recipe today. Thing is, the recipe I tried this weekend was…well, it was absurdly sweet*. And really eggy. And not exactly what I was going for. Stay tuned, though, I’ll be doing some more research and bringing those almost-savory apple pancakes to you shortly.

Instead, I bring you the meal that saved our aching stomachs after we ate the INSANELY sweet pancake I made. This simple, humble meal? Black Beans & Rice.

D and I met in a sort of study abroad program in college. I say “sort of” because we were only abroad for a month of the semester. We spent most of our time in D.C. interning and studying all things International Environment and Development. Then we went to Costa Rica for a field practicum. Which is another way of saying that our program paid for all 12 of us to go on vacation** for a month.

Anyway, while in Costa Rica we ate a lot of beans and rice – the start of a love affair. Back at school for our last years of undergrad (and our first years living off campus) we ate a LOT more rice and beans – in all permutations. More recently, D has been traveling to Miami every month and always makes a point to fill up on Cuban rice and beans. This dish is his version. Maybe you could call it “Cuban-New Mexican Beans & Rice?” Whatever it is called, D whipped this up while I was in a food coma from the pancake…

Again, we cooked the beans in the pressure cooker. 4 hours of soaking and 10 minutes cooking time at pressure. Can’t beat it! After they were done cooking, we rinsed the beans and added the rest of the ingredients to the pot. If you wanted, you could make this even heartier by adding chicken or, as I did today for lunch, topping with a fried egg.

Black Beans & Rice

  • 5 1/2 c black beans, cooked and rinsed (2 c uncooked)
  • 1 lg or 2 medium onions, diced
  • 1/2 t salt
  • 2 fresh green chiles, diced
  • 1 red bell pepper, diced
  • 1 T Ancho chili powder
  • 2 bay leaves
  • 2 oz dark chocolate
  • 3 c chicken broth, approximately
  • dash of Worcestershire (optional)
  • 3 c long grain white rice
  • 5 c water

Toss all but the last two ingredients into a large pot on your stove top. Turn up the heat and get things simmering. The chicken stock should just barely cover your beans. Easy, right? Simmer for 45 minutes to an hour.

Set your rice and water up in a smaller pot (or your rice cooker). Cook for 20 minutes or until rice reaches desired consistency.

Serve the beans atop the rice. Mmmm…

*Panic: did I measure wrong? No, no. The Cooking Light recipe really called for that much sugar!
**That is, of course, if you define vacation like we do: learning and exploring. We weren’t laying on the beach all day, every day. Only one or two of the days 🙂

Cornmeal Waffles

October 8, 2008

Now that things are cooling down a little in Tucson we actually have time to lollygag on weekend mornings. In the summer the only time worth being outside is early, early morning and, as a result, we got out of our weekend breakfast habit during that time. But, now that we have lovely weather until 10:30 or so (yes, it is still reaching 90 during the day, but that should change soon), we have time to enjoy a more drawn-out, conversational breakfast.

A while back we promised ourselves one morning each weekend where we could make something more fun than cereal and take the time to enjoy it. Because it’s breakfast, it’s a pretty private time in the sense that no one is really bothering us, which is great. We get to talk about new ideas we have and daydream about the future. It really is fun.

Each week we take turns picking what we’ll eat. We both pitch in making breakfast but, since we have differing needs when it comes to trying new things, we share the responsibility of choosing what to make. Usually, D chooses something really classic, like buttermilk waffles. I’m more likely to try and make something new and interesting. That’s not to say he doesn’t enjoy the new and interesting dishes…he’s just more drawn to classics and perfecting them. Like a moth to a flame, really.

I would guess that 50% of the time we make waffles or pancakes. One of my recent picks was to make waffles, but with a cornmeal twist.

This waffle recipe came from The King Arthur Flour Baker’s Companion, one of my very favorite cookbooks of all time. If you don’t have a copy of this book, I highly recommend picking one up. There is so much great information packed into Baker’s Companion, it’s a wonder it doesn’t cost twice what it does!

We both really liked the flavor of these waffles, especially with the blueberries. We did, determine that using a fine grind of cornmeal was a good idea (we used medium). Also, if you don’t have buttermilk on hand, turn to your inner chemist and, per cup of buttermilk needed, mix 1 T vinegar with enough milk to equal a cup. Be sure to let it stand for at least 5 minutes.

Crunchy Cornmeal Waffles

  • 1 3/4 c buttermilk
  • 2 large eggs
  • 5 T butter, melted and cooled OR 1/3 c vegetable oil
  • 1 1/2 c AP flour
  • 1 c yellow cornmeal
  • 2 T sugar
  • 2 t baking powder
  • 1 t baking soda
  • 1 t salt

Whisk together wet ingredients in a medium bowl. In a separate bowl, mix together the dry ingredients. Stir the dry ingredients into the wet ingredients. Don’t over stir! Your mixture will look lumpy…just let it be that way. If you stir too much, your waffles will not end up as light and fluffy as they could otherwise be. Let your batter sit for 10 minutes so the cornmeal has time to soften a little.

Drop the batter by 2/3 cupfuls on your preheated waffle iron. Makes about 10 8-inch waffles.

For the topping pictured here I used blueberry preserves that I heated up in the microwave (I prefer this to blueberry syrup) and sweetened sour cream (1 T powdered sugar/2 c sour cream).

What are you making for breakfast this weekend?

Mary’s temptation…

March 11, 2008

To keep my sourdough starter going I regularly reduce the existing starter down to 10g and then feed it equal parts of flour and water. But what’s a girl to do with all that extra starter that is essentially being tossed out each feeding?
English Muffins!

I came across this recipe over Wild Yeast when I was learning about how to maintain a starter.  It seemed like such a waste to be dumping off part of the starter each night, wasting the flour…it was getting costly since I wasn’t baking bread every day.  This really is a great way to keep from “wasting”  so much flour.  These are rich and delicious muffins.  Highly reccomended!

Cardamom Lime Sweet Rolls

January 27, 2008

This is an easy recipe at the very end of ths month’s Cooking Light. I HIGHLY reccomend that you give it a go. It is really light and delicious..not heavy and nauseating like some sweet roll recipes can be. You can find the recipe on the Cooking Light website or by following this link.